
“Your disk is almost full.” It’s one of the most common — and most annoying — warnings a Mac can show you. Left ignored, a full disk doesn’t just stop you from saving files: it slows down everything, because macOS needs free space for virtual memory swap, system caches, and updates. Apps beachball, Time Machine backups fail, and macOS updates refuse to install.
The good news: most full disks are full of things you don’t need. Caches, logs, duplicate photos, forgotten downloads, apps you haven’t opened in a year, and gigabytes of installer leftovers are all reclaimable — often 20–60 GB on a well-used machine, without deleting a single thing you care about.
This guide walks through seven proven methods, from quickest to most thorough. You can follow them manually with built-in macOS tools, or use a free utility like CleanMac to do the heavy lifting in minutes. Either way, let’s get your space back.
First: Check What’s Actually Taking Up Space
Before deleting anything, get a picture of your disk. Apple builds a decent overview right into macOS:
- Click the Apple menu → System Settings → General → Storage (on older macOS: Apple menu → About This Mac → Storage).
- Wait for the colored bar to populate. You’ll see categories: Applications, Documents, System Data (formerly “Other”), Photos, Mail, and so on.
- Click the ⓘ icon next to categories for Apple’s built-in recommendations: Store in iCloud, Optimize Storage, and Empty Trash Automatically.
This view tells you where the space went, but it’s deliberately conservative — Apple won’t point you at caches, leftovers, or duplicates. That’s what the seven methods below are for. Keep the Storage panel open in the background as you work; watching the free-space number climb is oddly satisfying.
> Rule of thumb: aim to keep at least 10–15% of your disk free (25–40 GB on a 256 GB Mac). Below that, performance degrades noticeably.
Method 1: Clean Junk Files (Caches, Logs, Leftovers)
Typical recovery: 5–20 GB
Junk files are the single biggest source of reclaimable space on most Macs. They accumulate silently:
- App caches — every app stores temporary data to speed itself up. Browsers, streaming apps (Spotify caches can exceed 10 GB), and chat apps are the worst offenders.
- System logs and crash reports — diagnostic files that pile up indefinitely.
- Browser caches — Safari, Chrome, and Firefox each maintain their own.
- Leftover installers — `.dmg` and `.pkg` files you’ve already used.
Manually: open Finder, press Cmd+Shift+G, and enter `~/Library/Caches`. You can delete the contents of cache folders here (not the folders themselves). Repeat for `/Library/Caches` (system-wide). Be selective — deleting something an app is actively using can cause a crash, so quit apps first.
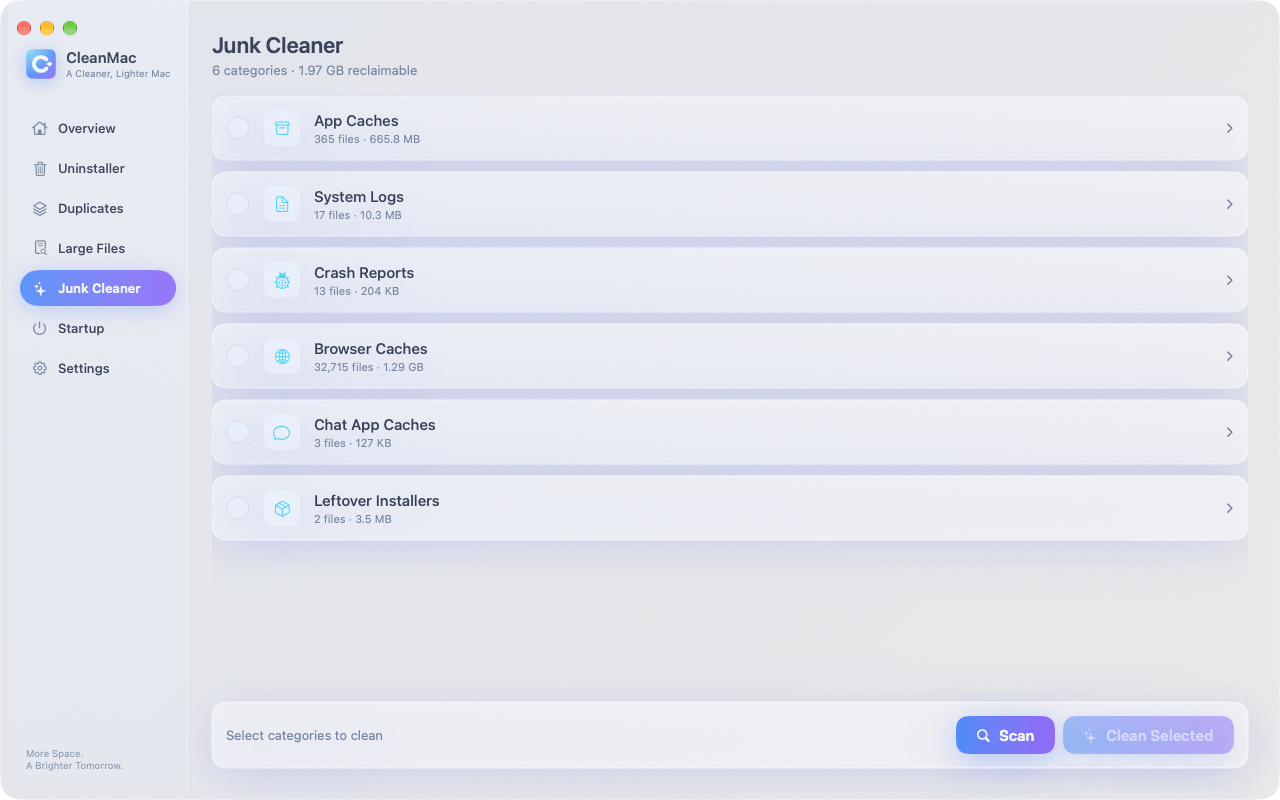
The easier way: a junk cleaner does this safely and thoroughly in one pass. CleanMac’s Junk Cleaner module scans app caches, system logs, crash reports, browser caches, chat app caches, and leftover installers, then shows you a categorized preview before anything moves to the Trash. On a typical two-year-old Mac, the first scan finds 8–15 GB.
Method 2: Uninstall Apps You Don’t Use
Typical recovery: 2–30 GB
Open your Applications folder and sort by size (View → as List, then click the Size column). Most people are surprised: games finished long ago, a 4 GB trial of a video editor used once, three browsers when you only use one.
Important: dragging an app to the Trash does not fully uninstall it. Apps scatter support files, caches, and preferences across your Library folders — sometimes hundreds of megabytes per app. To actually reclaim the space, you need to remove those leftovers too.
Manually: after trashing the app, check `~/Library/Application Support`, `~/Library/Caches`, and `~/Library/Preferences` for folders and files named after the app or its developer.
The easier way: CleanMac’s Uninstaller module lists every installed app with its total footprint including related files, removes everything together, and — our favorite touch — flags apps you haven’t opened in over 30 days. Sort by “last used,” and the dead weight identifies itself. We have a full walkthrough in our guide to completely uninstalling Mac apps.
Method 3: Delete Duplicate Files
Typical recovery: 3–20 GB
Duplicates happen to everyone: photos imported twice, a folder copied “just in case,” the same PDF downloaded four times. Individually small, they add up to serious space.
Manually: Finder’s Smart Folders can help — File → New Smart Folder, filter by kind (e.g., Images) and sort by name — but matching names don’t prove identical content, and comparing by eye is slow and error-prone.
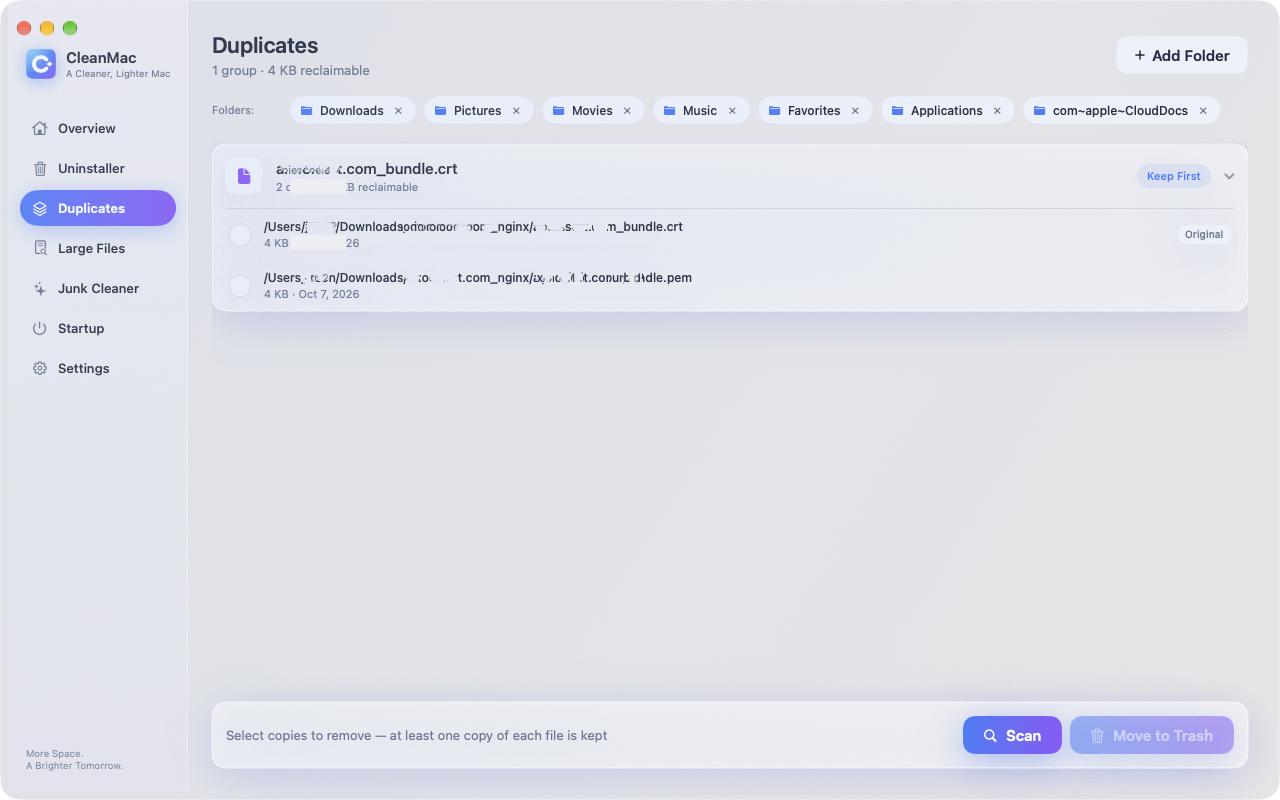
The easier way: a proper duplicate finder compares files by content hash, so it catches identical files even with different names, and never flags files that merely share a filename. CleanMac’s Duplicate Finder compares copies side by side and always keeps one copy safe, so you can’t accidentally delete every version. Photos libraries, Downloads folders, and desktop archives are where it earns its keep — expect 10–25% of a messy folder to be duplicates.
> Caution: limit duplicate scans to your folders (Documents, Downloads, Pictures, Desktop). Never deduplicate inside system or Library folders — some duplicates there exist for a reason.
Method 4: Find and Remove Large Files
Typical recovery: 5–50 GB
This is the highest-yield method per minute of effort. One forgotten 8 GB screen recording beats an hour of picking through 2 MB files.
Manually: in Finder, press Cmd+F, set the filter to File Size → is greater than → 500 MB, and search “This Mac.” Sort by size and review. Also check the usual suspects directly: `~/Movies`, `~/Downloads`, and any external-drive backup folders you once copied locally.
The easier way: CleanMac’s Large File Cleanup surfaces every file of 10 MB or more across your folders, sorted by size, so the biggest offenders are always at the top. Preview before deleting, and anything you remove goes to the Trash first.
Common large-file finds: old iPhone backups in `~/Library/Application Support/MobileSync/Backup`, disk images in Downloads, Zoom/Teams recordings, Aperture or iPhoto libraries you migrated away from years ago, and VM disk images from virtual machines you no longer run.
Method 5: Manage Startup Items (Frees Speed More Than Space)
Typical recovery: faster boot, lower memory pressure
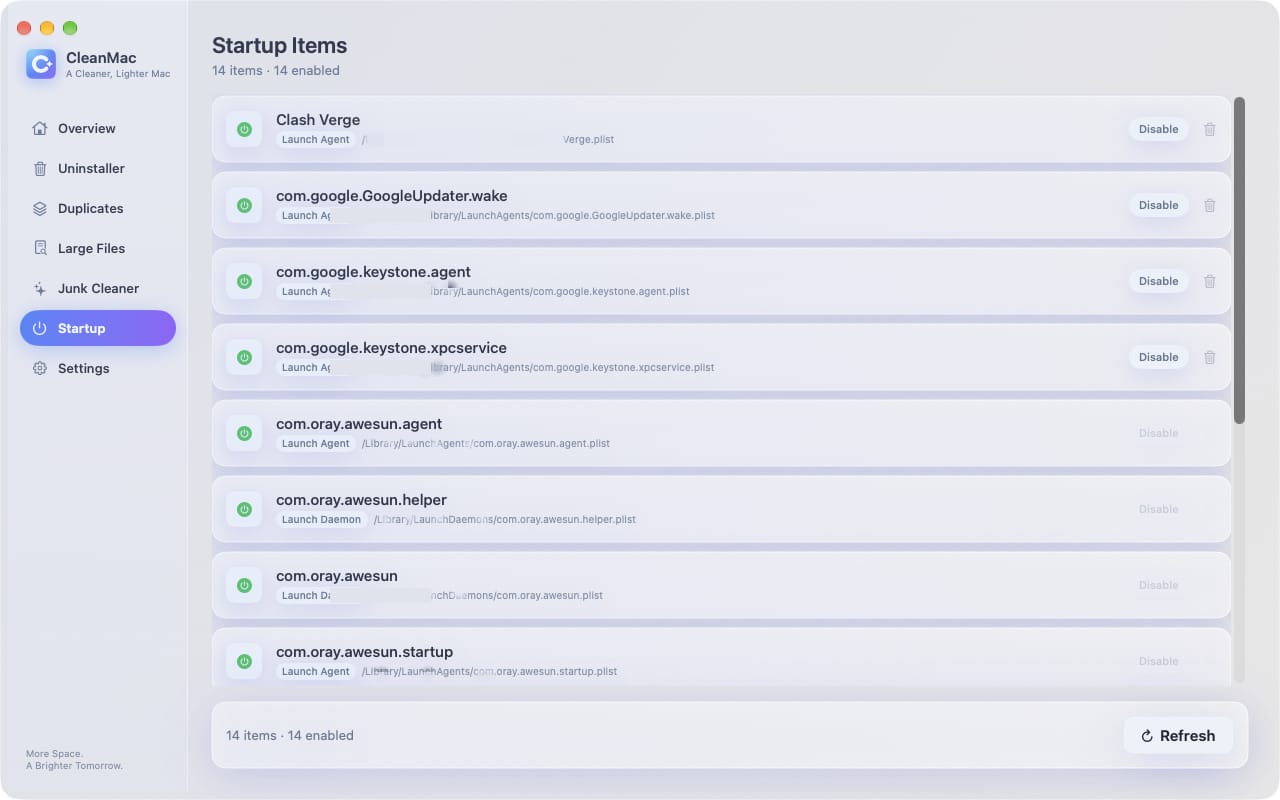
Startup items don’t consume much disk space directly — but they determine how fast your Mac boots and how much memory is spoken for before you open a single app. Every login item, launch agent, and launch daemon loads at startup, and after a couple of years of installing software, the list gets long.
Manually: go to System Settings → General → Login Items & Extensions. Review “Open at Login” and “Allow in the Background.” Toggle off what you don’t need. Apple’s interface is honest but minimal — it doesn’t show you what each background item belongs to or how heavy it is.
The easier way: CleanMac’s Startup Item Manager lists launch agents and daemons with their parent apps, lets you disable items to test, and remove what you don’t need. A lean startup list can cut boot time by 20–40% on older Macs and frees several hundred megabytes of RAM at every login.
Method 6: Empty Trash and Clean Out Downloads
Typical recovery: 2–15 GB
Two humble spots, outsized results.
The Trash is a holding area, not a deletion. Everything you’ve “deleted” still occupies disk until you empty it — we’ve seen Trash folders holding 20+ GB. Right-click the Trash icon in the Dock → Empty Trash. To automate it going forward: Finder → Settings → Advanced → check Remove items from the Trash after 30 days.
The Downloads folder is where files go to be forgotten. Sort it by size, and you’ll find disk images for apps installed years ago, zip archives already extracted, and email attachments you saved elsewhere too. Delete liberally — anything important in Downloads should have been filed properly anyway.
While you’re at it: Safari and Chrome keep their own download histories and offline data; clearing browser caches (Method 1) covers that side.
Method 7: Optimize Your Photo Library
Typical recovery: 5–40 GB
Photos is usually the largest single category on personal Macs. Three levers:
A. Use iCloud Photos with “Optimize Mac Storage.” In Photos → Settings → iCloud, enable iCloud Photos and choose Optimize Mac Storage. Full-resolution originals live in iCloud; your Mac keeps smaller versions and downloads originals on demand. This can shrink a 100 GB library to 10–20 GB locally. It requires enough iCloud storage (the free 5 GB won’t cut it; 50 GB is inexpensive), and originals need to download when you edit — fine on decent internet.
B. Prune within the library. Use Photos’ built-in Duplicates album (it appears in the sidebar when duplicates exist) to merge exact copies, and review Recently Deleted (Edit → Delete to purge; items auto-purge after ~30 days). Screenshots, bursts, and WhatsApp/WeChat auto-saved images are prime deletion candidates.
C. Attack the folders outside the library. Exported originals, edited copies in Downloads, and photo imports that were copied into the library and left in place are classic duplicate territory — this is where Method 3’s content-based duplicate finder pays for itself. CleanMac lets you set custom scan folders, so point it at Pictures and Downloads together.
The All-in-One Option: Do All Seven in One App
Everything above works manually — but it means bouncing between Finder windows, Library folders, System Settings, and Photos, and knowing which corners are safe to touch. If you’d rather do it in one sitting:
CleanMac bundles the whole workflow into six modules on one dashboard:
| This guide’s method | CleanMac module |
|---|---|
| 1. Junk files | Junk Cleaner |
| 2. Unused apps | App Uninstaller (with 30-day unused view) |
| 3. Duplicates | Duplicate File Finder |
| 4. Large files | Large File Cleanup (10 MB+) |
| 5. Startup items | Startup Item Manager |
| 6. Trash & Downloads | Junk Cleaner + Large File Cleanup |
| 7. Photos | Duplicates + custom scan folders |
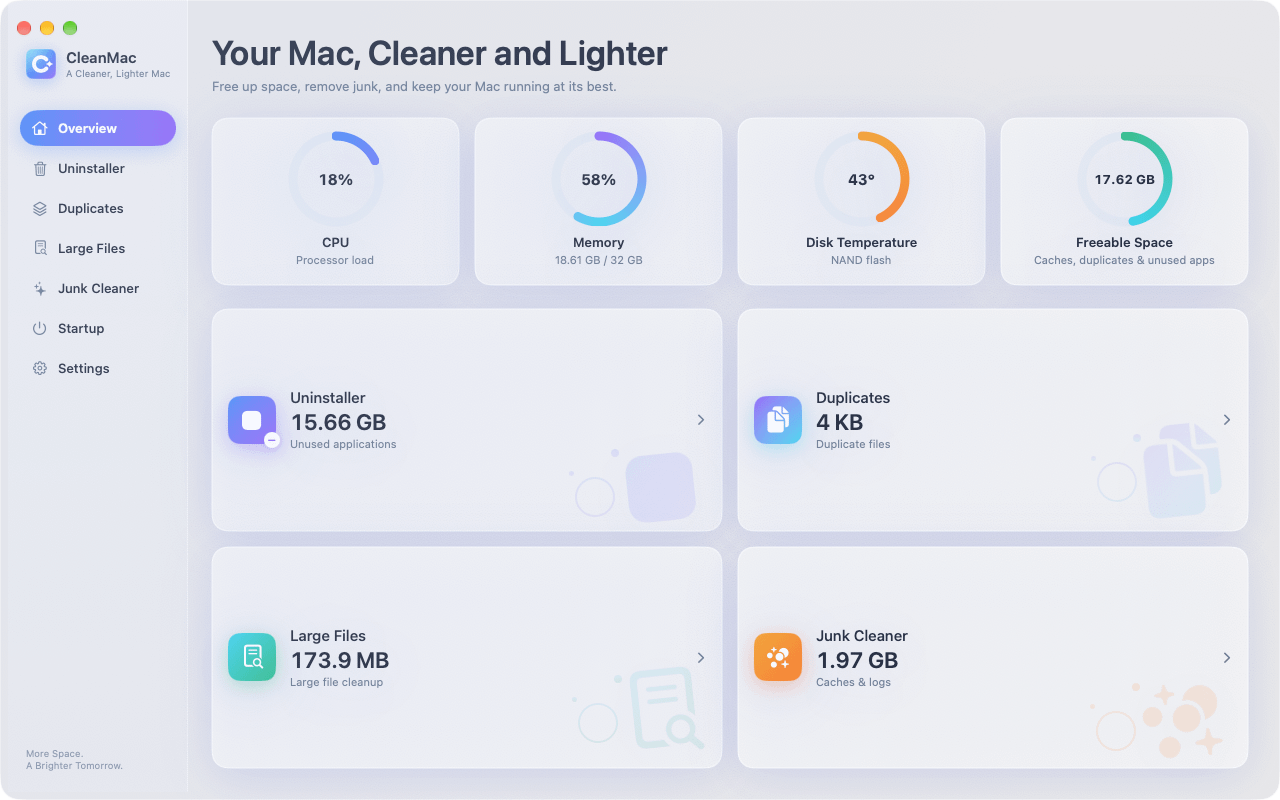
The Overview dashboard shows CPU, memory, disk temperature, and freeable space before and after each pass, every result is previewed before cleaning, and everything goes to the Trash — recoverable if you change your mind. It’s 100% free (all modules, no trial, no subscription), runs entirely locally with no account and no uploads, supports 11 languages, and requires macOS 13 Ventura or later.
A sensible monthly routine: open CleanMac, run Junk Cleaner, glance at Large Files, empty the Trash. Quarterly: add the Uninstaller’s unused-apps view and a duplicate scan of your Pictures folder. Total time: about ten minutes a month.
Prevention: Keep the Disk from Filling Up Again
Reclaimed space disappears faster than you’d think. Five habits keep it under control:
- Empty Trash automatically — Finder → Settings → Advanced → “Remove items from the Trash after 30 days.”
- Treat Downloads as a conveyor belt, not a warehouse. File or delete within a week.
- Delete installers after installing. The `.dmg` is dead weight the moment the app is in Applications.
- Audit apps quarterly. If you haven’t opened it in 30–90 days and it isn’t seasonal software, uninstall it (with leftovers).
- Watch the big three categories monthly: Storage settings take 30 seconds to check. Catching a runaway cache at 5 GB beats discovering it at 50 GB.
Conclusion
A full Mac disk is almost never full of things you actually need. Work through the seven methods — junk files, unused apps, duplicates, large files, startup items, Trash and Downloads, and photo optimization — and most people reclaim 20–60 GB in under an hour. Do it manually with Finder and System Settings if you enjoy the control, or let CleanMac handle all seven from one dashboard for free. Then build the five prevention habits into your routine, keep 10–15% of your disk free, and your Mac will stay fast for years. Looking for more tools to keep your Mac in shape? Browse our app collection.
Frequently Asked Questions
Why is my Mac’s disk full when I barely save anything?
Because most disk growth is invisible. Apps cache data continuously — browsers store every page’s assets, Spotify and Apple Music cache streams, chat apps save every image and video you’re sent, and Photos libraries grow with every iPhone sync.
What is “Other” (System Data) storage on Mac, and can I delete it?
“System Data” (called “Other” on older macOS) is a catch-all for everything that isn’t an app, document, photo, or clearly categorized media: caches, logs, disk images, archives, fonts, plug-ins, Time Machine local snapshots, iOS backups, and files Spotlight can’t classify. Some of it is essential; much of it is safe to reclaim.
Is it safe to delete cache files on Mac?
Yes, with sensible boundaries. Cache files exist to speed things up; deleting them just means the app rebuilds them next time it runs (the first launch after cleaning may be slightly slower).
How much free disk space does a Mac need to run well?
Aim for a minimum of 10–15% of total capacity: 25–40 GB on a 256 GB Mac, 50–75 GB on a 512 GB machine. macOS uses free space for virtual memory swap (when RAM fills up), system caches, and temporary files — starve it and everything slows.
Will freeing up disk space actually speed up my Mac?
It depends on how full you are. Above ~20% free space, cleaning won’t make the Mac measurably faster — your bottleneck is elsewhere.
What if I’ve cleaned everything and still need more space?
Then it’s time to move data rather than delete it. Options, roughly in order of cost: (1) iCloud — Optimize Mac Storage for Photos and iCloud Drive’s “Optimize Mac Storage” for Desktop & Documents can offload tens of gigabytes; (2) external SSD — a 1 TB USB-C drive is inexpensive and ideal for photo archives, video projects, and old iPhone backups; (3) cloud archives — move completed projects to Dropbox/Google Drive and keep them online-only; (4) for older Intel MacBooks only, some models allow drive upgrades, but Apple Silicon Macs are not upgradable — buy external storage instead.
How often should I free up disk space on my Mac?
A light monthly pass plus a deeper quarterly one works for most people. Monthly: run a junk cleaner, review large files, and empty the Trash — ten minutes, typically 3–10 GB reclaimed.


